Email management can be overwhelming so much that you end up not answering your emails. Sharing your inbox with your assistant helps free up time for more important work.
Both Gmail and 365 Outlook present ways to share access to your inbox with your assistant safely. You do not need to share your password with the assistant, and you can choose the permissions to give. This helps you retain overall control of your mailbox and let you review the assistant's work.
We have provided a step-by-step process on how to set up your Gmail and Outlook delegate access. Keep reading to learn how to share your inbox with an assistant.
Gmail Delegation
Gmail allows you to delegate your mailbox access to your assistant. This permission will enable them to read and respond to your messages on your behalf. Gmail delegation is a secure way of sharing access to your Gmail compared to revealling your password for access.
Below are the steps to follow to set up your Gmail delegation access;
- Log into your Gmail account
- Go to the settings option
- Select accounts tab
- Click on the add another account option
- Enter the email address of your Assistant
- Click on send email to grant access
- Your Assistant to confirm delegation request
Log into Your Gmail Account
You first have to log into your Gmail account as you cannot set up the delegation access from the Gmail app.
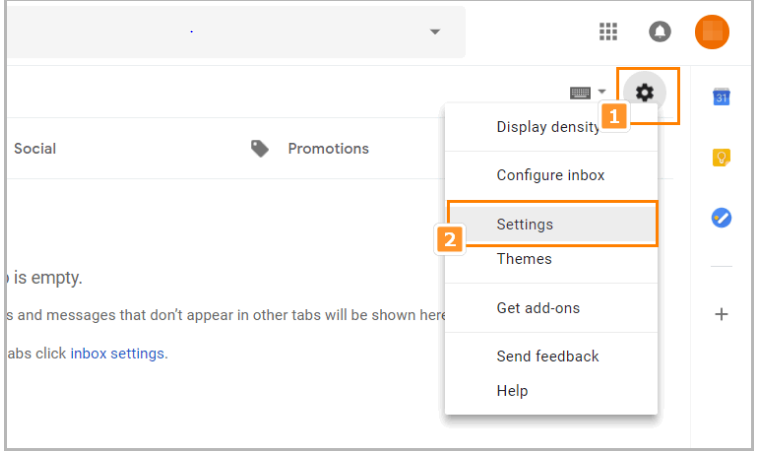
Go to The Settings Option
Log into your account, click on the settings icon. Once done, click on settings.
Source
. Click on settings. A new window will open. The next step is to click the Accounts tab on the same window. This tab may sometimes read Accounts and Import.

Source
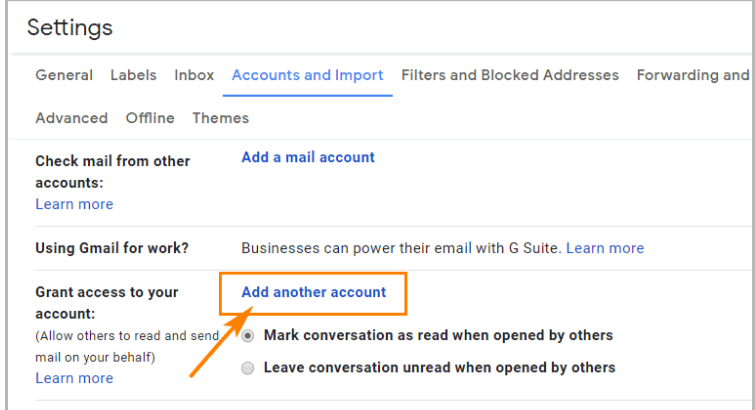
Click on The Add Another Account Option
Scroll down to find the Grant access to your account section. You will find it on the same screen you selected the Account Tab. Click the Add another account option to add your Assistant's email address.
Gmail allows you to add as many as ten delegates or up to 25 delegates if operating a business account.
Here, you can also choose an option as per your preference:
- Mark messages as read when opened by your Assistant, or
- Leave messages unread when opened by your Assistant
Source
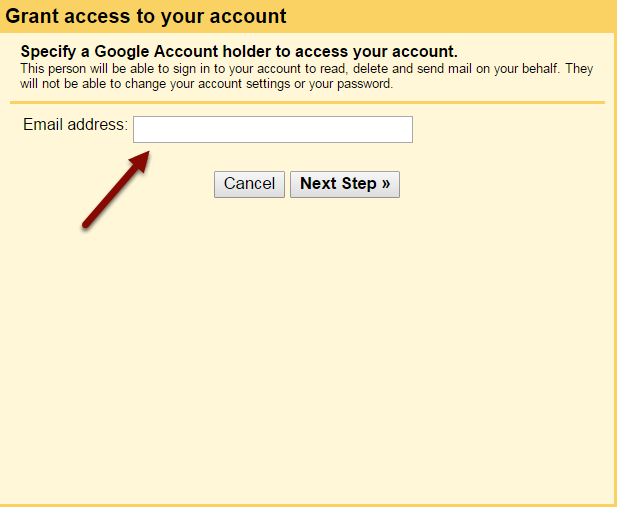
Enter the Email Address of Your Assistant
A dialogue box will open. It will prompt you to add your Assistant's email address and then click on next.
You are only able to enter a google email address. The reason is you get access to Google accounts in the same Google Apps Organization only. Meaning that you can only delegate to a @gmail.com address if you have a @gmail.com address.
 Source
Click on Send Email to Grant Access
Once you have entered your Assistant's email address, you need to confirm that it is correct. If that's the case, click the send button to grant access.
Your Assistant to Confirm Delegation Request
After step 6 above, your Assistant needs to send a confirmation request. The Assistant will only have access to your email once they confirm the request. But, it may take you up to 24 hours before you can see them as your Delegate.
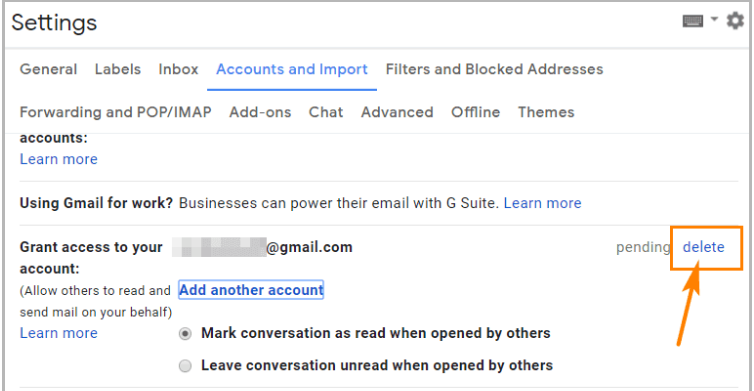
Gmail delegate allows you to revoke access to your inbox. You can choose to do so if you no longer want your Assistant to access your account or have switched delegates.
Below are the steps to follow;
- Onthe Gear icon select Settings
- Click the Accounts tab (could also be Accounts and Import tab)
- On the right side of Grant access to your account section, click Delete. This action will remove the account you no longer want to grant access to your inbox.
Source
Office 365 Outlook Delegation
Office 365 delegation feature allows an assistant to help you manage business emails by setting delegate access in Microsoft Outlook. Your Delegate will then be able to receive, respond and send emails on your behalf. Outlook also gives options to configure access permissions to limit access and functionality. You can grant access for;
1. Reading emails only
2. Reading and responding to mails
3. Sending mails only
4. Full control over your inbox
Once you set up the permissions, you may need to wait for about 60 minutes for the action to take effect. To grant many users your mailbox access, you could create an office 365 shared mailbox.
Both you and your assistant must use the same version of outlook to complete all the instructions to do the delegation task.
Follow the steps below to set up outlook 365 office access permissions;
- Open Microsoft Outlook application
- Go to the File menu, click Account Settings. Click on Delegate access.
- Once the delegation window appears, click Add.
- Type or use the search field to find the name of your Assistant (Delegate)
- Configure the specific permissions on the Delegates Permissions window
- then select how you would like to handle your related emails
- Select checkbox- the Automatically Send a message to delegate summarizing these permissions
- Select checkbox – Delegate can see my private items (Optional)
- Click okay
Open Microsoft Outlook application
Open your Microsoft Outlook application.
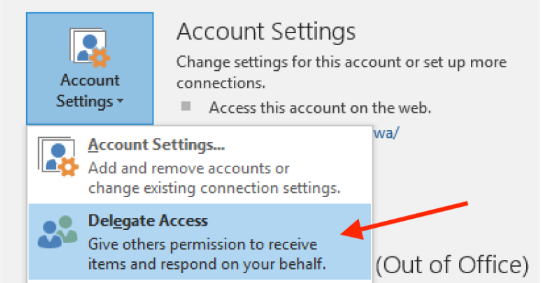
On the File Menu, Select Account Settings, Then Click on Delegate Access
On the top left corner of the Outlook window, click on the File menu. Click on Account Settings under the Info tab, then select Delegate Access.
Source
Once the Delegation Window Appears, Click Add
After selecting the Delegate Access, the Delegates window will appear. In this window click Add to add your Assistant to your outlook account.

Source
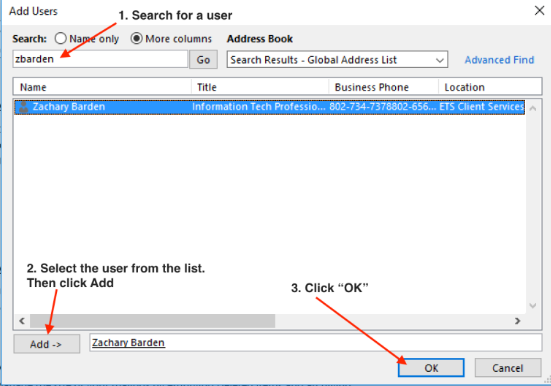
Type or Use the Search Field to Find the Name of Your Assistant (Delegate)
Type your Assistant's name or search their name in the Search field to find them. Then click on the name in the search results list. Thereafter, click the add button followed by okay to continue.
Source
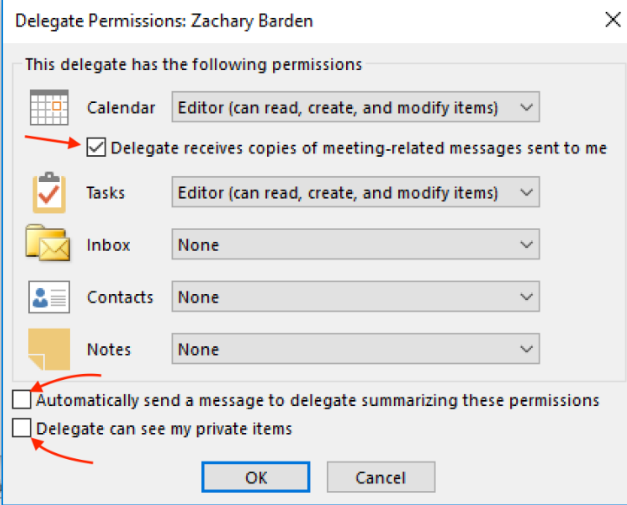
Configure the Specific Permissions on The Delegates Permissions Window
Here you can configure the specific permissions you wish to grant your Assistant. Giving access to your email inbox, means your Delegate will be able to read your messages. Outlook has four Delegate permission levels: Editor, Author, Reviewer, and None. The most recommended level is the Editor permission. Editor permissions level can be set for Calendar, Tasks, Inbox, Contacts, and Notes.
Source
Choose How You Would Like to Handle Your Related Emails
You need to choose how they will handle your meeting related emails. We recommend that you send meeting invites to your Assistant but also receive your copy.
Source
Select Checkbox - The Automatically Send A Message to Delegate Summarizing These Permissions
Select the check box; Automatically Send a message to delegate summarizing these permissions. This sends a message notifying your Assistant of the access permissions.
Select Checkbox – Delegate Can See My Private Items (Optional)
Select the checkbox; Delegate can see my private items. This should only be in case you need copies of meeting requests and responses sent to your Assistant. Ensure you assigned your assistant the Editor permissions level. The Editor level allows the Delegate to read, create, change items.
Click Okay
Click okay to grant 365 Office Outlook Delegate permissions to your Assistant.
Delegate Access to Private Items
You can grant your assistant access to your private items by following the steps below;
- Go to the File tab
- Select Account Settings, then click Delegate Access
- Click on the name of your Assistant then click Permissions
- Select the checkbox- the Delegate can see my private items
Likewise, you can also hide your personal information from your Delegate. Do this by opening each personal item, then go to the Tags group and click on Private.
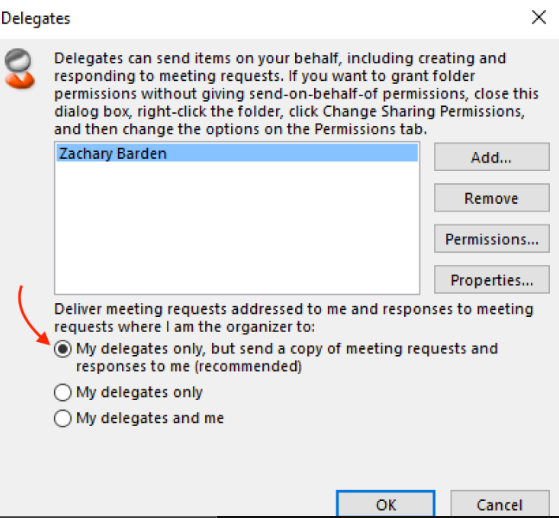
Changing Permissions for A Delegate
Office outlook allows you to change permissions for a delegate. Here is how to change access permissions;
- Go to the File tab
- Select Account Settings, then click Delegate Access
- Click on the name of your assistant (whom you want to make changes to permissions). Click permissions
- Change permissions for the Outlook folder your Assistant has access
- Send a message to notify the assistant of the permissions changes. Do so by selecting the automatically send a message to delegate summarizing these permissions check box.
To remove all Delegate Access permissions, click on the remove option in step 2 and skip all the other steps.
When you give your email password to someone, you put your confidential emails at risk. But with Gmail's Delegation access, your assistant uses their own password and has limited access to all of your emails.
Conclusion
Gmail accounts are intended for use by one individual. However, if you are a business or large organization, multiple people may need to access the same account, possibly from different locations. Accessing a Gmail account from multiple devices or more than your assigned quota of devices per user may result in a temporary lockdown and or loss of access to email based on the nature of the violation.
Sources:
https://www.assistly.ee/blog/why-and-how-to-delegate-your-email-to-an-assistant
https://support.apu.edu/hc/en-us/articles/221897728-Set-up-Gmail-Delegation
https://bleakton.com/set-up-mail-delegation-on-gmail/
https://www.fhsu.edu/tigertech/documents/Delegating%20Access%20and%20Managing%20Mail-Calendar%20in%20Outlook
https://support.microsoft.com/en-us/office/allow-someone-else-to-manage-your-mail-and-calendar-41c40c04-3bd1-4d22-963a-28eafec25926
https://www.uvm.edu/it/kb/article/delegate-access/